Praktika Newsletter August 2015
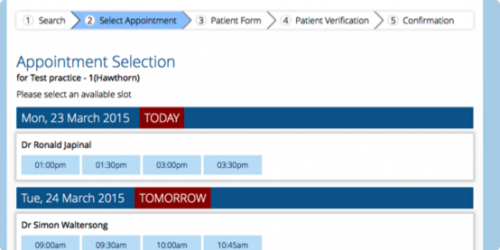
Praktika Automated Appointment Reminders
This one has been one of the most sought features – an ability to automatically send and receive SMS reminders.
Located in Management -> Practice Details -> Appointment Auto Reminders

this feature allows you to set up to 3 consecutive SMS reminders to be sent fully automatically.
You can choose a time period when a message is to be sent (ranging from minutes to months) and setup different templates for different messages. You can even force sending the message to those who prefer not to be contacted by SMS.
The messages scheduled for delivery several days, weeks or months before the appointment can all be sent together at a particular time of the day (e.g. at 10.00 am).

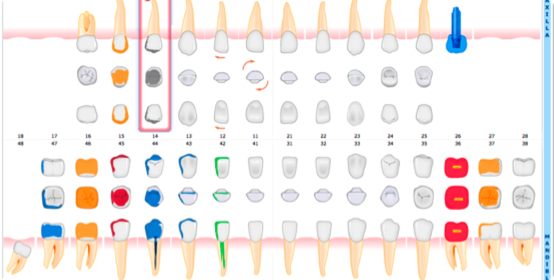
Restorative Charting
Praktika Restorative Charting Updates
The new colour scheme tackles the issues of distinguishing between the existing conditions and existing treatment, as well as between the proposed and accepted treatment.As part of the complete overhaul of the Restorative Charting, a new colour scheme has been introduced.
The new colour scheme is as follows:
- “Grey” for conditions like caries, cracks, chips, etc (has not changed)
- “Blue” for existing treatment had done elsewhere (man-made conditions) like implants, fillings, bridges, crowns, etc. (new)
- “Orange” for Proposed treatment (new)
-
“Red” for Accepted treatment (has not changed)
-
“Green” for completed treatment. (has not changed)
Grey and Blue used to be the same – Grey.
Orange and Red used to be the same – Red.
This is the first step to a fully customisable colour scheme to be released soon. The new scheme will allow to keep the colours exactly as they were or introduce your own colour scheme.
The new colour scheme will allow colour differences between different material fillings or crowns, inlays/onlays vs regular fillings, etc.

Posts in Charting
Charting of posts was added to the Restorative Charting. They can be set as an existing treatment or as proposed/accepted/completed treatment.Posts in charting
New Surface Selection Shortcuts
In addition to the standard shortcuts: “m“, “d”, “i”, “o”, “l” a new set of keyboard shortcuts added:

for MO, OD, MOD
“z” – left side (2 surfaces),
“c” – right side (2 surfaces) ,
“x” – MOD (3 surfaces),
“a” – ALL (5 surfaces)

Feature Article
Infection Control with Praktika
There has been a lot of attention recently to the Infection control and we heard that some practices were penalised because of some deficiencies in this area. Luckily they were not Praktika’s customers. We have quickly upgraded our infection control utilities to provide a comprehensive tracking solution.
Autoclave tracking has the following tasks (stages)
1. Sterilise instruments
2. Link sterilised instruments to Autoclave cycles
3. Link sterilised instruments to a Patient Appointment
4. Find all the Autoclave cycles (and instruments) related to the Patient and Appointments.
Some autoclaves have built-in printers that are capable to produce barcode stickers upon the completion of cycles. Some autoclaves have external label printers that can be connected to print the barcode stickers. Generally, such printers are rather costly and the labels they produce may not have all the information necessary for quick tracking.
Praktika offers a solution for cases when there is no autoclave barcode printer or the label is wanted to contain more information (customised label content).
HARDWARE
Label Printer
Price around $130.00DYMO LabelWriter 450 Turbo.
It is by far the most common label writer on the market today. It can be bought in virtually any office supply store (like Office Works, etc.). We bought ours online and labels, too. www.dymoonline.com.au
Works on Macs and on Windows PC.
You will also need
– 89 x 36 mm self-adhesive labels in a roll. White SD99012 or Transparent SD99013 for standard barcode labels OR/AND
– 101 x 54 mm self-adhesive labels in a roll. White SD99014 for extended QR barcode labels.

1D Barcode Reader
ScanQuick Handheld USB Barcode Scanner.
Price around $50.00
It can be used to scan Standard 89 x 36 mm labels with Code 128 barcode.
We have been using this scanner that we bought on Ebay from an Australian reseller. http://www.ebay.com.au/itm/NEW-ScanQuick-Laser-USB-Barcode-Scanner-POS-GST-Invoice-/170514379178?ssPageName=ADME:L:OU:AU:3160
It seems to be a quick, reliable device. We have had it for over 3 years and it has never failed us. However, it is only capable of reading 1D barcodes like Code 39, Code 128, EAN, etc.
 ONLY
ONLYIt cannot read 2D barcodes like QR.
Handheld/Stationery USB Barcode Scanner – Honeywell 1400G 2D.

2D Barcode Reader
Price around $180.00
You will need this to scan Praktika’s extended barcode labels because they are using QR barcodes (2D type).
 and
andThis is a more advanced and professional device with extra capabilities. It can work as a hand held scanner (scan with a button press) or it can work automatically when positioned on a supplied stand (support). It can read 1D and 2D barcodes and it can read them in any orientation (sideways, upside down, on an angle). You can buy it in any Point of Sale (POS) company. We bought ours at www.aussiepos.com.au There are other sites like POS Central or HotPOS Australia. Shop for the better price.
Other scanners may also work. You just need to make sure they are capable of reading Code 39 Extended, Code 128 Extended and QR barcode types.

Label Generation
Go to Praktika’s Management Module and click on Utilities. There are 2 utilities there for generating labels: the 1st one for the Standard Label (Code 128), the second one is for the Extended Label (QR).
The Honeywell 1400G scanner can read both labels, while the ScanQuick can read only the Standard Label.

1D Standard Label
The Standard Label (89 x 36 mm)
Code 128
Click on the “Generate Dymo Autoclave Label” button.
Fill in the necessary details. The only compulsory field is the Cycle ID (Number). All the other fields are optional as they can be traced and obtained in the autoclave log by the Cycle ID. Specify how many labels (copies) you need to print. Each copy will have its number in the bottom right corner. It is a common practice to produce 2 labels: one goes on the pack of the instruments, the other goes to the Steri Log Book for todays date.
Please mind that due to the nature of Code 128 (max 40 characters) the Cycle Type is limited to 4 characters and Cycle Id to 8 Characters. If you need more characters please use the Extended Label as it has no such limits.
This is the produced Standard Label


Praktika’s code is also human readable. You can see the date, time, cycle type and cycle ID embedded in the code.
2D Extended Label
The Extended Label (101 x 54 mm)
QR
Click on the “Generate Dymo Autoclave Label QR” button.
Fill in the necessary details. The only compulsory field is the Cycle ID (Number). All the other fields are optional as they can be traced and obtained in the autoclave log by the Cycle ID. Specify how many labels (copies) you need to print. Each copy will have its number in the bottom right corner. It is a common practice to produce 2 labels: one goes on the pack of the instruments, the other goes to the Steri Log Book for todays date.
You can also add the instruments you have been sterilising. You can manage your standard kits in Management -> Practice Details -> Sterilisation Kits
This is the produced Extended Label


This label is using QR code and it can be read by scanners that support 2D barcodes. It has a lot more human readable information as there is a lot more data that the 2D codes can record.
Sterilisation Kits Management

You can also add the instruments you have been sterilising. You can manage your standard kits in Management -> Practice Details -> Sterilisation Kits
Recording the Autoclave data to Patients files
1. Open an Appointment

- Click on “Autoclave Tracking” button at the bottom
- Scan your label using your Barcode Scanner
All the scanned Autoclaves labels for a particular patient can be looked up at the Autoclave History in the Patient file. We will also soon add a facility to find the labels by the Autoclave Cycle ID, the Sterilisation Date or Appointment Date.
Other New Features.
- Upon a change of fees in a Fee Schedule now there is an option of updating all incomplete item fees.
- There is a new Fee Schedule type – ADA with Subcategories that provides for step-down fees.
- You can now copy the fees from one Fee Schedule into another by drag–and-drop of their buttons on each other. For example, if you need to create a step-down version of your existing fee schedule, create a new blank step-down fee schedule and then drag-and-sdrop your existing Fee Schedule onto the new one.
- Accounts Receivable, Balance Ageing and Birthday Reports can now print/email/sms documents(reminders) from the report.
- A few other reports received upgrades: new columns, new data, provider selection, etc.
- Incomplete appointments can now reassign the provider from a drop-down control (like the completed appointments had)
- New Macros placeholders introduced: next/last appointment date, total amount owing, etc.